Blinking Eyes & Moving Mouth Feature
*This feature requires TyranoScript V525 or V600 and above.
With TyranoScript, implementing blinking eyes and moving mouths is very easy.
You can see a live demo of this feature on the page below.
Live Demo URL
Prepare Eye Blinking & Mouth Moving Images
Let’s try out Tyrano’s blinking eyes and moving mouth features.
First, you’ll need to prepare some sprite images (image variations).
For this example, we’ll use the following images:

This is the base image, which we’ll name "base.png".
Next, prepare the eye and mouth movement variation images. These must be the same resolution as the base image.
In this case, the resolution is 452x720px.
【Eye Blinking Images】


These represent the open (open.png), half-closed (mid.png), and closed (close.png) states.
Now let’s do the same for the mouth animation.
【Mouth Movement Images】


These are also open (open.png), mid (mid.png), and closed (close.png) states.
Once ready, place the images in the data/fgimage/chara1 folder as you would with regular character images.
In this example, the folder is structured as shown below:

Displaying a Character with Blinking Eyes and Talking Mouth
Now let's use the images we prepared to display a character in the game.
There’s no big difference from displaying a normal character—it’s simple to do.
It’s not mandatory, but understanding the character part layering system will help you grasp the concept better.
Be sure to check it out later.
What is the Character Part Layering Feature?
Now, let’s write the code.
;chara1
;Define the character
[chara_new name="chara1" jname="Sato" storage="chara1/base.png"]
;Eye blinking setup
[chara_layer name="chara1" part="eye" id="normal" storage="chara1/eye/open.png" frame_image="close, mid" frame_time="4000-6000,80,80"]
;Mouth movement setup
[chara_layer name="chara1" part="mouth" id="normal" storage="chara1/mouth/close.png" lip_image="mid, open"]
;Display the character on screen
[chara_show name="chara1"]
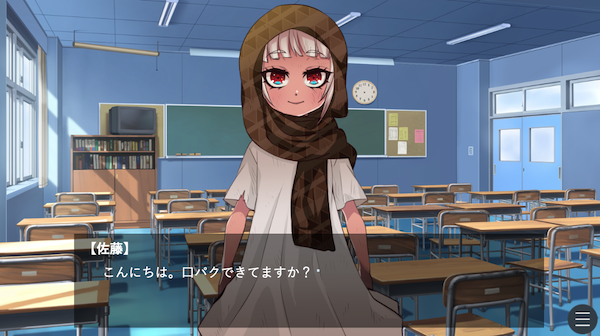
#chara1
Hello there. Is my mouth moving properly?[p]
Once you test it, you’ll see the character blinking and moving their mouth properly, right?
First, you use the [chara_new] tag to register the base image.
;chara1
;Define the character
[chara_new   name="chara1" jname="Sato" storage="chara1/base.png"]
storage="chara1/eye/open.png" frame_image="close, mid"
Make sure that all images are placed in the same folder as `open.png`.
In this case, the animation order will be: open → close → mid
The `frame_time` parameter controls the animation timing.
frame_time="4000-6000,80,80"
• open.png is shown for a random duration between 4000–6000 milliseconds
• close.png is shown for 80 milliseconds
• mid.png is shown for 80 milliseconds
Using a random interval for eye blinking creates a more natural animation.
The mouth movement setup works the same way.
Tyrano automatically links it using the `name`, and the character's mouth will move automatically while they are talking.
There are two types of mouth movement: one for text and one for voice (lip sync).
If not specified, it defaults to text-based mouth movement.
Tip
If you want to change the blinking or mouth movement speed during the game,
you can override it by redefining the [chara_layer] tag.
For example:
[chara_layer name="chara1" part="eye" id="normal" storage="chara1/eye/open.png" frame_image="close, mid" frame_time="100,100,100"]
#
Blinking got faster, didn’t it?[p]
This kind of effect is also possible.
Lip Sync Linked to Voice Audio
So far, we’ve created lip sync linked to text, but
creating lip sync linked to voice audio is also very simple.
Take a look at the following code:
;Setting up lip sync
[chara_layer name="chara1" part="mouth" id="normal" storage="chara1/mouth/close.png" lip_image="mid, open" lip_type="voice"]

;Display the character on screen
[chara_show name="chara1"]

#chara1

[playse chara="chara1" storage="voice/chara_1.mp3"]
Hello. Is the lip sync working?[p]
lip_type="voice".Then, at the timing of the audio playback, use:
[playse chara="chara1" storage="voice/chara_1.mp3"]
By specifying the character name, their mouth will animate in sync with the voice.
Normally, the mouth stays closed when there's no sound, moves to a mid state with low volume, and opens fully with higher volume.
You can fine-tune the sensitivity of these changes using the
lip_volume parameter.For more details, please refer to this article: Detailed Explanation of Eye Blink & Lip Sync Features.
More Detailed Parameter Explanation
As you've seen so far, this is an incredibly powerful feature.
You can use it not only for blinking and lip sync, but also to express things like
clothes or hair blowing in the wind.
For even more details and advanced usage, please check the link below.
Detailed Explanation of the Eye Blink & Lip Sync Feature
Support Sites
Contact Us
Email: shikemokumk@gmail.com
2016 © STRIKEWORKS All Rights Reserved.